Well, another post about my 550D before I continue with normal daily blogging post. This time I will like to share about my noob experience for a rookie DSLR user. From the start, till my current state of knowledge.
I remember the first thing I did after unboxing my 550D is to try out some shots. As I said before, I have least knowledge about the camera settings and all I need to do is to get hands on experience while learning along the way. I start off with the P mode and tried to take a few shots. When I'm reviewing the pictures taken through the LCD screen, the images were sharp but somehow I feel that a normal compact can also produce such similar image quality. Besides, I also wonder where is the bokeh I expect to see from a DSLR photo?
Stupid me, yes I'm. I thought one lens can satisfy all conditions, now only I know that each lens delivers different types/quality of images. Oh well, I guess I have to start from scratch and learn everything again. Starting with the booklets provided and the camera manual. There are lots of terms and jargon to learn from and I will simply list out some and compare the before and after.
Shutter Speed (Exposure Time)
Before:
I thought shutter speed is only used to freeze a subject with higher shutter or to show movements of a subject with slower shutter.
After:
Besides the above mentioned, shutter speed also controls the amount of light entering the camera through the exposure time, and to be captured by the sensor. The aperture size has a relation between the shutter speed used. Inappropriate use of shutter speed may result in overexposed or underexposed images. Faster shutter speed also reduces blur caused by handshake. There are different optimum shutter speeds for different focal lengths in order to avoid or reduce handshake. This is what I learn so far, if there is any other information you would like to share, do drop me a message.
for more reference, visit wikipedia
Aperture/F-number (Both may be the same but actually is different technically)
Before:
I know nothing about aperture before this. Often saw the F numbers on the labels of the lens but never know what it means.
After:
Understands reassembles the pupil of a human eye, a hole that permits light rays to pass through it. Controls the depth of field (DOF), the amount of light enters. Comes with different number of blades. What else? There's much to learn about controlling aperture and F-number in order to produce sharp images of different effects. Each lens has their own optimum F-value to be used in order to achieve maximum sharpness, also depends on the type of camera body used.
for more reference, visit wikipedia as a start.
Aperture - wiki
F-number - wiki
Metering mode
Before:
I mistaken it as the area used by the camera to auto-focus
After:
It's a way of the camera to measure the exposure
further reading, wikipedia
Well, there's a lot more to learn about the technical terms and also ways to utilise it, as well as hands on practice. The above is just some examples of confusion that often face by rookies like me in the beginning. However, no doubt I will use my free time now to gain more knowledge and to learn all the different techniques and to understand how a camera and a lens work to bring out an image, particularly the behaviour of each lens.
Besides the technical terms that are commonly found in photography, not forgetting the terms used to label the lens, or to be precise, Canon lenses. Before this, besides the focal length, I do not know how to read the labels off the lens itself. After reading a booklet given by Canon, which is the "EF Lens Selection Guide", it all becomes clear to view.
The EF series lenses are design to mount on Canon EOS family cameras and the EF-S series is specially for cropped bodies such as my 550D. Some lens nomenclature that are common to find on a EF/EF-S lenses are:
IS - Image stabilisation, similar to Nikon's VR, Tamron's VC and Sigma's OS, it has a built in mechanism to counter handshake and enables the user to use 3 stops slower shutters than non IS lenses.
USM - Ultrasonic Motor, similar to Nikon's AF-S, Tamron's USD and Sigma's HSM, different from the normal micro motor used in common lenses, provides, fast, quiet and accurate focusing.
DO - Diffractive Optics, similar to Nikon's ED, Tamron's LD and Sigma's APO, are special coated glass/optics, to reduce CA (Chromatic Abbreviation)
L - The red L of Canon lenses indicates "Luxury", is a perfectly built lens in terms of performance and quality for the professional line up of lenses. This luxurious lens also comes with a hefty price tag and commonly used by professional photographers. The L-lenses can be read off from the red L letter after the aperture value, as well as the red ring around the lens and some will appear in white colour for the lens body.

an example taken from wikipedia - The Canon EF 70-200mm f2.8L IS II USM
Besides the nomenclature of the lenses, I also learn to classify different types of lenses including standard zoom, telephoto, super telephoto, prime/portrait, macro, wide angle, ultra wide angle (UWA), tilt shift and some special effect lenses such as lomo and fish-eye.
Some rules/terms regarding photography, for example:-
Bokeh - Blur background image rendering, originated from the Japanese word "bokeh", which means blurry. Often used to make the subject stand out from the blurred background especially in portrait shots. The smaller the F-number, the more bokeh you got.
Depth of Field - The portion/area of the image which appears to be sharp. The simple rule is, the smaller the F-number, the smaller the DOF. DOF is important so that the subject you wish to capture is sharp and clear. Compare both pictures below for a better understanding.
Some rules/terms regarding photography, for example:-
Bokeh - Blur background image rendering, originated from the Japanese word "bokeh", which means blurry. Often used to make the subject stand out from the blurred background especially in portrait shots. The smaller the F-number, the more bokeh you got.
Depth of Field - The portion/area of the image which appears to be sharp. The simple rule is, the smaller the F-number, the smaller the DOF. DOF is important so that the subject you wish to capture is sharp and clear. Compare both pictures below for a better understanding.

Picture taken @ f/5 - from wikipedia
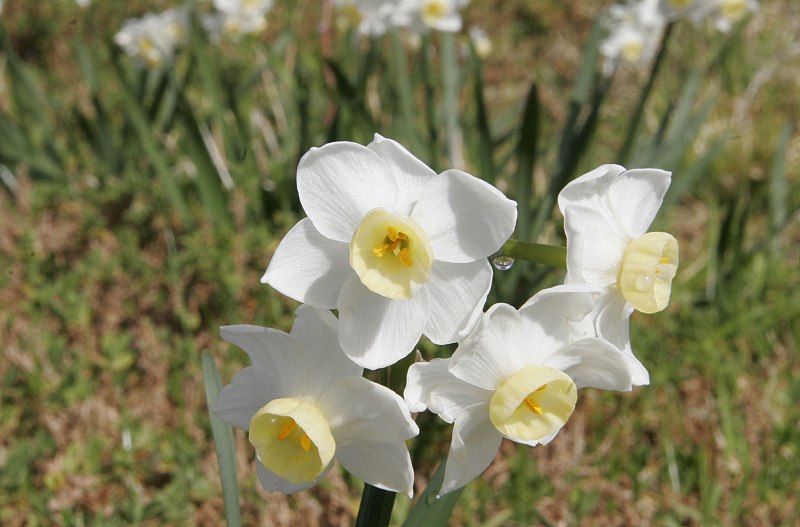
Picture taken @ f/32 - from wikipedia

A general understanding of what is DOF - from wikipedia
A very useful online DOF calculator: here
1/3 Rule - Rule of composition which originated from the art of paintings. "The rule states that an image should be imagined as divided into nine equal parts by two equally-spaced horizontal lines and two equally-spaced vertical lines, and that important compositional elements should be placed along these lines or their intersections." - Bryan F. Peterson (2003)
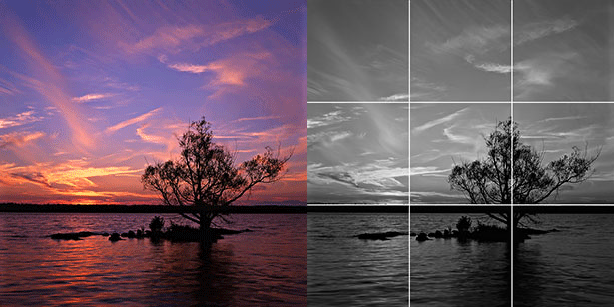 Example of the 1/3 Rule applied - from wikipedia
Sunny 16 Rule - A reference rule to use when taking pictures under sunny condition.
Example: (wikipedia)
- On a sunny day and with ISO 100 film / setting in the camera, one sets the aperture to f/16 and the shutter speed to 1/100 or 1/125 second (on most cameras 1/125 second is the available setting nearest to 1/100 second).
- On a sunny day with ISO 200 film / setting and aperture at f/16, set shutter speed to 1/200 or 1/250.
- On a sunny day with ISO 400 film / setting and aperture at f/16, set shutter speed to 1/400 or 1/500.
| Aperture | Lighting Conditions | Shadow Detail |
|---|---|---|
| f/22 | Snow/Sand | Dark with sharp edges |
| f/16 | Sunny | Distinct |
| f/11 | Slight Overcast | Soft around edges |
| f/8 | Overcast | Barely visible |
| f/5.6 | Heavy Overcast | No shadows |
| f/4 | Open Shade/Sunset | No shadows |
| Add One Stop | Backlighting | n/a |
Well, that's pretty much on what I would like to share about the technical parts. There's more to explore but I think I covered enough for now. Maybe I'll share more of my knowledge in future posts. I get to know all these through readings, be it from books or from the internet. Wikipedia may not be the best source, but it is the easiest to start with before heading to the more technical ones.
My First 1000 frames
Well, I read somewhere saying that the first 10,000 frames of your first DSLR will be wasted shutters, more or less useless as we are in our learning progress. All the shutters are wasted when we learn on how to correctly expose our pictures, how to grab the correct composition, how to control the aperture and stuff.
As for my first 1000 frames, it is pretty much true. My first outdoor shooting was at KLCC together with my NS friends. Due to the fact that I'm very new to DSLR, and do not know about all the manual shooting modes and their functions, such as M, Av, Tv etc. I start off with the M mode because it gave me more controls such as both shutter and aperture, that was what I thought at that time. I do not know what is the use of Av and Tv, so I choose not to play with these settings until I read up about it.
The pictures came out under my M mode often underexposed or overexposed, sometimes out of focus (OOF) as well, which is quite frustrating. Only a few of them are usable. Well, that was my first 100 frames, pretty normal for a starter like me.
My first indoor night shooting is to celebrate my gf's birthday, belated, at Palate Pallete. Well. this time, the results are better but still more to learn. I do not know how to catch the angle and correctly compose a food picture. I do not know where to focus in order to produce sharp pictures, but I do know how to correctly expose my pictures. It's like I level up-ed my first level.
My second indoor/outdoor shooting was at 1U and The Curve, together with my NS friends. This time, having the experience from the previous ones, I'm able to get more usable pictures than before. But there's a quite funny experience where I do not know where to set for 10 sec timer for my 550D because I haven't read it from my manual. From the camera menu itself, it only shows a 2 second countdown timer. I didn't know the remote option in the camera is actually the 10 sec countdown timer. End up I have to rush from my camera to the pack when I'm trying to take a group photo. LOL at me, yes it is.
The remaining of my 1000 frames were shot in Desa Park City, together with my gf's dog. Was trying to learn to snap some pet pictures outdoor. Which turn out average and nothing special. There's more to learn about this and another field to explore about panning. Should try it again with my prime lens in the future.
The reason I wrote such a long post, explaining this and that, is not to show off about my camera or my limited knowledge. This is to share about what a newbie like me confused about photography and the ways to learn it. Excessive reading and hands on practice is the way to go. Learning about the behaviour of their own cameras and lens will be an advantage for snapping breathe taking photos as well as for future upgrade purposes.
There is still another field of photography that I'm really blur at, which is flash photography, or strobist. It is a different field of photography which requires mastering of light and the ways to manipulate it.
Learn more about flash photography through --> Strobist: Lighting 101
I will end my post here and might share some others in future post.
My First 1000 frames
Well, I read somewhere saying that the first 10,000 frames of your first DSLR will be wasted shutters, more or less useless as we are in our learning progress. All the shutters are wasted when we learn on how to correctly expose our pictures, how to grab the correct composition, how to control the aperture and stuff.
As for my first 1000 frames, it is pretty much true. My first outdoor shooting was at KLCC together with my NS friends. Due to the fact that I'm very new to DSLR, and do not know about all the manual shooting modes and their functions, such as M, Av, Tv etc. I start off with the M mode because it gave me more controls such as both shutter and aperture, that was what I thought at that time. I do not know what is the use of Av and Tv, so I choose not to play with these settings until I read up about it.
The pictures came out under my M mode often underexposed or overexposed, sometimes out of focus (OOF) as well, which is quite frustrating. Only a few of them are usable. Well, that was my first 100 frames, pretty normal for a starter like me.
My first indoor night shooting is to celebrate my gf's birthday, belated, at Palate Pallete. Well. this time, the results are better but still more to learn. I do not know how to catch the angle and correctly compose a food picture. I do not know where to focus in order to produce sharp pictures, but I do know how to correctly expose my pictures. It's like I level up-ed my first level.
My second indoor/outdoor shooting was at 1U and The Curve, together with my NS friends. This time, having the experience from the previous ones, I'm able to get more usable pictures than before. But there's a quite funny experience where I do not know where to set for 10 sec timer for my 550D because I haven't read it from my manual. From the camera menu itself, it only shows a 2 second countdown timer. I didn't know the remote option in the camera is actually the 10 sec countdown timer. End up I have to rush from my camera to the pack when I'm trying to take a group photo. LOL at me, yes it is.
The remaining of my 1000 frames were shot in Desa Park City, together with my gf's dog. Was trying to learn to snap some pet pictures outdoor. Which turn out average and nothing special. There's more to learn about this and another field to explore about panning. Should try it again with my prime lens in the future.
The reason I wrote such a long post, explaining this and that, is not to show off about my camera or my limited knowledge. This is to share about what a newbie like me confused about photography and the ways to learn it. Excessive reading and hands on practice is the way to go. Learning about the behaviour of their own cameras and lens will be an advantage for snapping breathe taking photos as well as for future upgrade purposes.
There is still another field of photography that I'm really blur at, which is flash photography, or strobist. It is a different field of photography which requires mastering of light and the ways to manipulate it.
Learn more about flash photography through --> Strobist: Lighting 101
I will end my post here and might share some others in future post.


 Posts
Posts


0 comments:
Post a Comment